
Learn how to make this cute mini album - Step by step Tutorial
I did this album for my husband, I wanted to give him something special, something unique :)
In this step by step tutorial you will learn how to make this Photo Album that you can give it like a gift for Valentines Day, Mothers Day, Birthdays etc. With this handmade Album you can prove to your loved ones that you care about them & you are willing to create special gifts and not just buy them. Remember, without love we are lost ! :)
Subscribe to our channel: www.giuliasart.co.uk
Visit our Shop on Etsy: www.giuliasart.co.uk
Watch more awesome crafts here: www.giuliasart.co.uk
Your Likes, Comments & Share motivate us to prepare more craft ideas and tutorials for you. So please like, share, and comment.
Step 1: Watch the Video!
For some people its easier to watch a video than following step by step photos.
So if you are one of them I hope that this video will help you !
Step 2: Gather Your Tools & Supplies!
DISCLOSURE*
I participate in affiliate programs like amazon.com and others. That means I receive a commission when products are purchased through links here in this Instructable. (At NO additional cost to you.) Please know I will never share or even review a product that I would not personally recommend or that I do not personally like.
Step 3: Making the Cover ( Dimensions )

To make the cover you will need:
Black card stock
Red card stock
Decorative paper
Self adhesive magnetsStep 4: Making the Cover ( Sign and Score )

Sign the black card stock on both sides.
Unite the points.
Score along the lines.
Fold it.
Stick 3 magnets on the edge of the short side.
Attach the other 3 magnets on top of the first ones.
Fold the cover same as i did and let the second set of magnets to stick by themselves on the big rectangle.Step 5: Making the Cover ( Decorating It )

Using a glue snail, stick the red card stock on top of the black base.
Then stick the decorative paper on top of the red rectangles.
Do the same on both sides.
Now take the small black rectangle and with a border puncher, create a decorative strip.
With glue dots, stick the strip onto the outside part of the cover.
Add also a piece of ribbon on top of the decorative strip.Step 6: Making the Envelopes Using the Cricut Explore 2 - ( Optional )

Open the Cricut machine & software.
In your work space design a 9" X 6" rectangle.
Create 2 vertical scoring lines at 2"1/4 and 6"1/2.
Also create one horizontal scoring line at 5"3/4.
Insert an A4 red card in your machine and press start.
Let the machine do your work :)
Take your piece of card and fold it along the lines.Step 7: Making the Envelopes by Hand :)

Take a 9" x 6" piece of red card and score it at 2" 1/4 and 6" 1/2.
Turn the card and score it at 1/4 on the long side.
Fold along the lines.
With a scissor, cut the small rectangles as i did.
Using adhesive tape, stick it all together.
Mark the middle of your envelope and with a circle puncher, cut a small hole.
Repeat the process until you will have 6 envelopes.Step 8: Sticking the Envelopes on the Cover
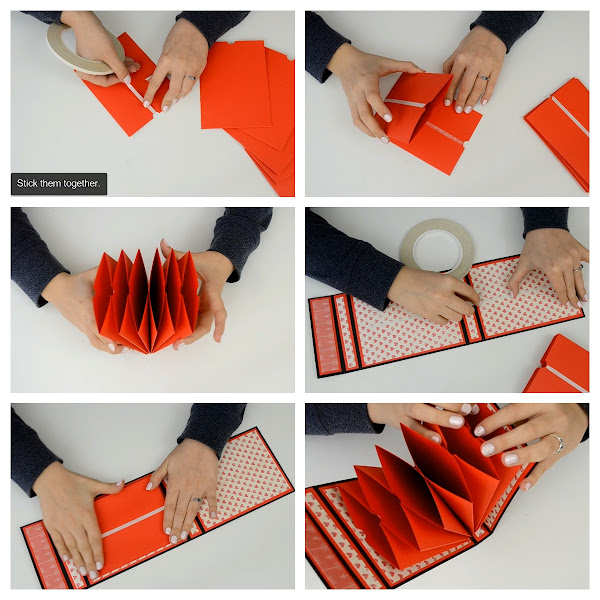
Put a strip of adhesive tape on the middle of each envelope.
Stick the one on top of an other, like an accordion.
Add adhesive tape on the middle of the big rectangles of the cover same as I did.
Then stick the envelopes on the cover.Step 9: Making the Tags ( Dimensions )

To make the tags you will need:
Black card stock
Decorative paper
EmbellishmentsStep 10: Making the Tags ( Decorating Them )

With a glue snail, stick the decorative paper on the black base.
You can also add embellishments on the decorative paper.
Print 6 pictures.
Using photo corners, stick the pictures on the other side of the tag.Step 11: Finishing the Album

Put the tags inside the envelopes.
Using glue dots, add a butterfly button on the ribbon strip.Thats it! You just learned how to make an accordion mini album :)
Step 12: More Project Videos!
Perhaps youll like some of my other crafts.
Check them out at: http://giuliasart.com
Write me your comments about this project on my Youtube video(comments section)!
Fuente: este post proviene de Giulia's Art, donde puedes consultar el contenido original.
¿Vulnera este post tus derechos? Pincha aquí.
Creado: